2. Bot
This is the second challenge - build your robot and get it moving!
- Language
- C++
- Est. Time
- 30—60min
- Difficulty
- Intermediate
Requires a PC and a Hedgehog Bot kit
From the kit, you'll need everything: your WeMos board, microUSB cable, two motors and drivers, screen, 9V battery and adaptor, body and jumper cables. If you need to build a kit, or you don't recognise something, you can reference the part list.
This challenge is for Hedgehog Bot v2 only
Hedgehog Bot Kit V1 was distributed in 2015 and contains an Arduino Nano and breadboard. No further workshops are being developed for older versions of the kit, although a compatible version of this challenge is available.
-
Setup your computer
If you’ve not installed the Arduino IDE and required libraries, complete Setup your computer from the first challenge. Please double check that your board works and can run the Blink code before continuing.
At DigiMakers events, this has already been done for you.
-
Build the body
Follow the video below. Ask a helper if you’re stuck or a body part is hard to click in to another part.
-
Wiring the screen
Plug 4 wires from the WeMos into the back of the screen. The screen should still be mounted on the body. You don’t need to use the exact wire colours.
If using the WeMos D1 WiFi,
SCLandSDAare on the opposite side and are labelledSCL/D3andSDA/D4. If you’re not sure which board you’re using, ask – but only the D1 WiFi has D1 WiFi written on it.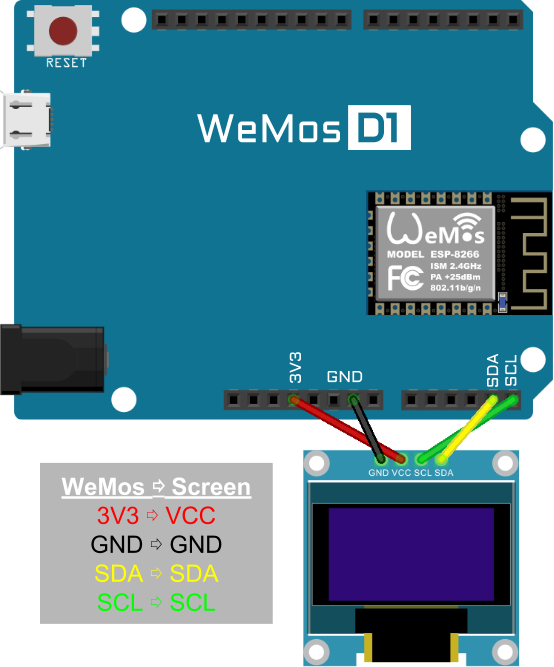
-
Wiring the left motor
Plug 6 wires from the WeMos into the left motor driver. If you look at the bot with the screen facing you, the driver is on the left side of the body. You don’t need to use the exact wire colours.
If using the WeMos D1 WiFi, you instead need to wire the
5Vpin on the WeMos to+on the motor,GND→-,MISO/D6→IN1,SCK/D5→IN2,D2→IN3andD0→IN4.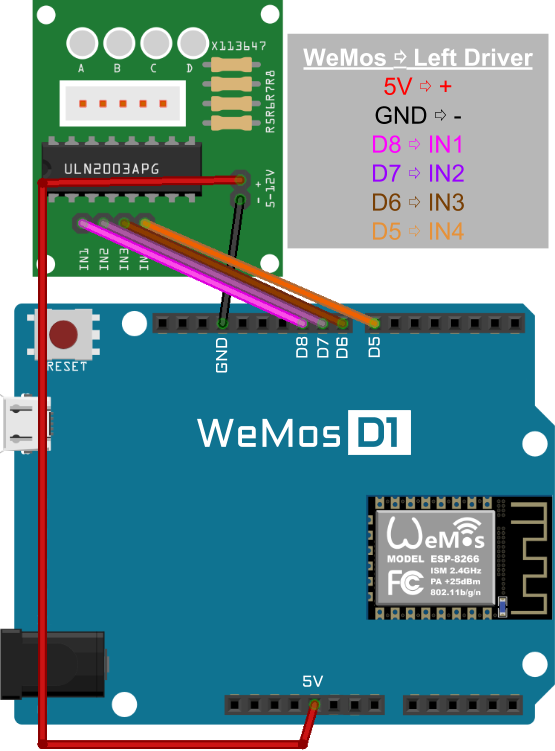
-
Wiring the right motor
Plug 6 wires from the WeMos into the right motor driver. If you look at the bot with the screen facing you, the driver is on the right side of the body. You don’t need to use the exact wire colours.
If using the WeMos D1 WiFi, you instead need to wire the second
5Vpin on the WeMos to+on the motor,GND→-,D12/MISO→IN1,TX1/D9→IN2,D8→IN3andMOSI/D7→IN4.
-
Plugging things in
Plug the motor cables into the drivers. The white connector should click in to the white socket on the driver. Do this for both motors.
-
Code
Now you’ve built your bot, it’s time to test the screen and motors.
If you’re using the WeMos D1 WiFi and Visual Studio Code, you’ll first need to open
platformio.iniand replaceboard = d1_miniwithboard = d1.Have a look at the code below. This code will:
- draw a smile face on the robot screen
- turn the robot motors right for a second
- stop the motors for a second
- repeat over and over!
#include "drawFace.h" #include "espDualStepper.h" void setup() { Draw.start(); // set up screen Motor.start(D5, D6, D7, D8, D4, D3, D0, RX); // set up motors } void loop() { Draw.smile(); // this draws a smile face on the Hedgehog's screen delay(1000); Motor.right(); // this makes the motors to turn right delay(1000); Motor.stop(); // this tells the motors to stop delay(1000); }-
Copy the code above and paste into the IDE.
If you’re using the WeMos D1 WiFi, you’ll need to replace
Motor.start(D5, D6, D7, D8, D4, D3, D0, RX);withMotor.start(D7, D8, D9, D12, D0, D2, D5, D6);. -
Press the upload button . You’ll see the code compiling and uploading in the black box at the bottom. When it’s done you should see ‘Done Uploading’ just above the black box.
If the screen isn’t displaying or the motors aren’t moving ask a helper to check your wiring. Wiring the motors incorrectly is also the №1 cause of
espcomm_sync_failederrors. If it’s not clear why you’re getting this error, sometimes plugging in another board and uploading to that - or restarting your computer - then retrying with your hedgehog works. -
Dance!
Now you’ve built your bot it’s time to make it dance!
Use the following commands inside the loop to make the bot dance. Don’t forget delays!
Motor.forward();
Motor.reverse();
Motor.left();
Motor.right();
Motor.stop();

Draw.smile();
Draw.frown();
Draw.wink();

delay();
-
Challenge Complete!
You should now know a bit about wiring, programming and dancing. When you're ready, continue to the next challenge.