1. LED
This is the first challenge - learn some programming and create some Morse code!
- Language
- C++
- Est. Time
- 15—45min
- Difficulty
- Easy
Requires a PC and a Hedgehog Bot kit
From the kit, you'll need just your WeMos board and a microUSB cable. If you need to build a kit, or you don't recognise something, you can reference the part list.
This challenge is for Hedgehog Bot v2 only
Hedgehog Bot Kit V1 was distributed in 2015 and contains an Arduino Nano and breadboard. No further workshops are being developed for older versions of the kit, although a compatible version of this challenge is available.
-
Setup your computer
You have two options: Arduino IDE is very simple—and therefore better for beginners and the very young, hence why we install it on our laptops—but we generally recommend Visual Studio Code.
Option 1: Arduino IDE
- Download Arduino IDE from arduino.cc, install and open it.
- Click File→Preferences (Arduino→Preferences on Mac), and paste
http://arduino.esp8266.com/stable/package_esp8266com_index.jsoninto Additional Boards Manager URLs. - Click Tools→Board→Boards Manager…, then click Type→Contributed followed by esp8266 by ESP8266 Community. Click Install.
- Download the required libraries
-
Extract the libraries and copy the folders inside to your Arduino libraries folder (usually Documents\Arduino\libraries).
In Windows 8.1, your default Documents folder may be in OneDrive.
If using macOS, or your hedgehog is not recognised by Windows, Download the CH341 driver. Support for CH340/CH341 is included in most versions of the Linux kernel, so there does not appear to be a driver for this platform.
- Click Tools→Upload Speed and choose 115200.
Option 2: Visual Studio Code
- Download Visual Studio Code from code.visualstudio.com, install and open it.
- Open the Extensions sidebar .
- Search for and install the extension PlatformIO IDE.
- Wait for the panel that pops up at the bottom of the screen to ask you to restart VS Code, and do so.
- Download the starter workspace (you might need to click Save if you’re using Edge or Firefox), and extract it somewhere (Windows: Open folder, right-click hedgehog-starter and click Extract all…; Mac: double-click it).
- In Visual Studio Code, click File→Open Folder and open the extracted starter (it’s normally in Downloads).
- If you don’t see a row of icons in the bottom-left corner after a few seconds, including a tick and upload icon , restart VS Code.
- From the Explorer sidebar (pages icon), open src/main.cpp.
-
We also recommend changing a few settings to make Visual Studio Code easier to use for beginners:
- If you don’t like the color theme, click the settings cog at the bottom of the activity bar (next to the sidebar, with the big icons), click Color Theme and choose an option from the pop-up list.
- In Settings (File→Preferences→Settings), Set C_Cpp: Autocomplete to disabled.
- Right-click the top of the sidebar and choose Hide Sidebar.
- Right-click the activity bar and choose Hide Activity Bar.
- Nearly all notifications can be disabled by clicking Don’t Show Again when they pop up.
-
Connect the WeMos board to your PC using the microUSB cable, and skip to step 3.
If using macOS, or your hedgehog is not recognised when you come to upload your code, Download the CH341 driver.
-
Connect the board
- Connect the WeMos board to your PC using the microUSB cable.
-
Click Tools→Board→LOLIN(Wemos) D1 R2 & Mini.
The board may also be called Wemos D1 R2 & Mini.
- Click Tools→Port→COMx, where x is any number greater than 1.
-
LEDs and Loops
A LED (Light Emitting Diode) is a little light which is built into your WeMos. It’s a great thing to use to try out some code. Before you start coding, you need to know about comments, the setup and loop:
// this is a comment, started with a // // it is used to explain something in your code void setup() { // here, between the {} we're inside the setup // this happens first to set up things! } void loop() { // here, between the {} we're inside the loop // this happens after the setup // this then repeats over and over again forever! } -
Blink Code
The builtin LED is an Active LOW component meaning that setting it LOW turns it on and setting it HIGH turns it off. Active HIGH components turn on when set HIGH and turn off when set LOW.
Have a look at the code below. This code will:
- turn off the LED for one second
- turn on the LED for one second
- repeat over and over!
#include "Arduino.h" void setup() { pinMode(BUILTIN_LED, OUTPUT); // set up the LED } void loop() { digitalWrite(BUILTIN_LED, HIGH); // turn off LED delay(1000); // wait one second digitalWrite(BUILTIN_LED, LOW); // turn on LED delay(1000); // wait one second }- Copy the code above and paste into the Arduino IDE
- Press the upload button . You’ll see the code compiling and uploading in the black box at the bottom. When it’s done you should see ‘Done Uploading’ just above the black box.
- You should see an LED flashing on and off once a second on the WeMos!
- Now try changing the size of the delays - what do you think will happen if the delays are 2000 milliseconds instead of 1000? Upload the code to see!
Troubleshooting
-
If you see a long error in Arduino IDE about stuff being missing or undeclared, double check the board in the Tools menu and that esp8266 is installed in Boards Manager.
-
If you see
espcomm_sync failed, your computer and board are struggling to talk to each other - try a different USB port, restarting your computer or asking a helper, who may replace your board. -
If you receive an error Please specify ‘upload_port’ for environment or use global ‘–upload-port’ option, your hedgehog has not been recognised: try unplugging it and plugging it back in (using a different USB port if you can).
-
Visual Studio Code might get confused on some Windows laptops (like versions of the Lenovo Thinkpad X1), and auto-detect your Hedgehog on the wrong COM port. To fix this, open Device Manager and look for USB-SERIAL CH340 (COMx) under Ports (COM & LPT) (x can be any number). Add a line to
platformio.inithat readsupload_port = COMx(where x is the number you saw). -
If you see an error when you try to upload your code that reads “You are not logged in. Please log in to PIO Account…”, double check you tapped the upload icon and not the “PlatformIO: Upload to remote device” icon next to it.
-
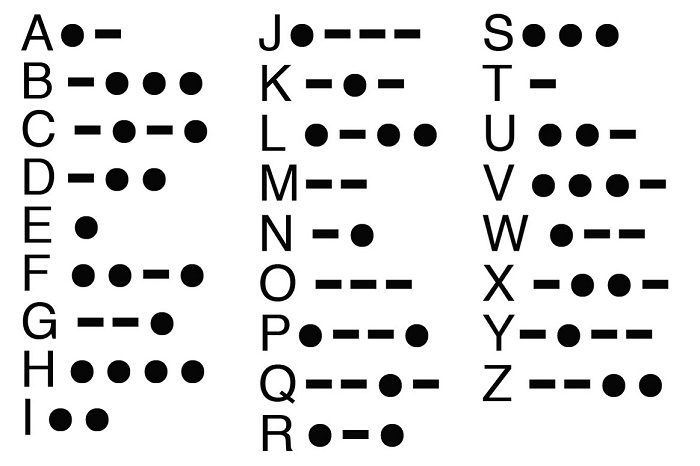
Morse Code
Now you know how to change the speed of flashing of your LED, let’s use that to make some Morse code! Your challenge is to spell SOS using the LED.
Use the chart below for help. A dot is a short pulse of light, and a dash is a long pulse. Don’t forget to add an extra delay at the end of the word.
-
Challenge Complete!
You should now know a bit about LEDs, loops, delays and Morse code. When you're ready, continue to the next challenge.